Mt. Kenya Technical Climb: SE Normal Route. Scramble up scree, conquer challenging pitches, and reach the summit
Mount Kenya Technical/Rock Climbing is serious and it is important to acclimatise well before tackling the main summit. This is a detailed Mt. Kenya Technical Climb (SE Normal Route) climb.
Normal Route (Nelion SE-face) Route
Summit: Nelion (5,188m), Batian (5,199m) via the “Gates of Mist”.
Technical Grade: 4
Season: November, December, January, February.
Length: 450 metres, 18 pitches
Duration: 8 hours climbing, 1 overnight, 3 hours descent
Ratio: 1 guide to 2 guests
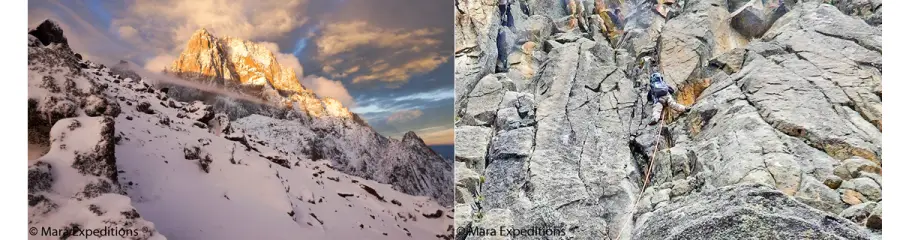
The Normal Route to Nelion is attempted via the southern side of Mt. Kenya and is best accessed from the Austrian hut. After crossing the Lewis Glacier with head torches on, you scramble up the scree to the base of the climb. Generally, you have completed the first 2 pitches before the first light. Once the sun does come out, the climbing becomes even more enjoyable. As you work through the pitches, you will pass famous features such as “1 o’clock gully,” “The Amphitheatre,” and “De Graf’s Variation,” which will present some easy and some challenging climbing. “Bailey’s Bivy,” which is a disused hut, can be considered the halfway point on this spectacular route.
The summit of Nelion is generally reached in 8 hours, Howell Hut, on the summit of Nelion, can be used as an overnight bivy should the group be interested in crossing over to Batian. The crossing over to Batian is via the “Gates of Mist,” which involves dropping some 35m off Nelion and climbing a further 50m to the summit. The estimated time to do this crossing and return to Nelion is 3–4 hours and is totally dependent on ice levels within the “Gates of Mist.” A night in Howell hut is recommended, descending the following morning.
Route Pioneers
It is this route to Point Nelion that saw Eric Shipton complete the first ascent to the summit of Mt. Kenya in 1929. He was with PW Harris before he became part of a reconnaissance team on Mt. Everest. The route has many other famous stories from famous faces of the past, which you will have to discuss with your guide during the unforgettable climb.
Starting times for the route are usually such that you arrive at the first pitch just before dawn. However, one can certainly climb the first few pitches in the dark.
Always plan and allow for an extra day or two, to allow the weather to be favourable to the climb.
Pitch 1. Climb up from the cross in a circle on good rock. At 20 metres, a move right leads to a ledge. Continue right on the ledge for 2 metres and belay off the horn. 20 metres, (IV.)
Pitch 2. Climb cracks up and continue up ledges and short, easy steps for 20 metres. The belay is at the rappel anchor. 15-20 m. (III.) Pitches 1 and 2 can be combined.
Pitch 3. From the belay, walk left and, arrive at the main gully, where you shorten the rope and move together for 60 metres up the gully, then climb right and up to the rappel anchor on the right side of the gully (10–15 m). (Scrambling and III.) It is divided into 2 pitches.
Pitch 4. Climb left and back to the centre of the main gully. Pass the rappel anchor with old ropes on a detached rock below the corner. Enter the corner above and climb to its top. Belay at rappel anchor above. 40-45 m. (IV+-V)
Pitch 5.
Climb the left side of the easy slab above. Pass the 2 pitons below the steepening wall, then climb up and right on steep blocks, then corner to a large terrace with a rappel anchor on the block. Belay here. 40-45 m. (III, IV)
Pitch 6.
Continue up and left on large ledges to the base of a chimney. Climb up in the left-facing chimney, then traverse horizontally, a bit left on the easy rock, under a steep orange wall for 4 m. 35-40 m. (III, V+)
Pitch 7.
Continue up the steep but easy blocky terrain while you cross the small ridge to the left at the cairn to enter the lower right edge of the Amphitheatre (30 m). (II)
Shorten the rope and climb together for about 60 metres up the right edge of the Amphitheatre to the highest and best bivy ledges, just under a low-angled slab. Scrambling diagonally, then belay the huge detached block with fixed blue rope on the right side of the Amphitheatre (Sc).
Pitch 8.
Climb up and right into the gully. Belay the left face of a gully on a little terrace near the top of the huge west face (There’s no fixed anchor) 20 m. (III)
Pitch 9.
Round the huge blocks on the right ridge then turn left and the belay is on the left face of a gully (2 pitons and ropes) 15-20 m. (II-III)
Pitch 10.
Continue up and diagonally right, above the huge west face, on the right side of Firmin’s Tower. The rappel anchor is 35–40 m. THIS ROUTE PART IS USUALLY ICY, so it might be quite slippery and difficult. (IV-V)
Pitch 11.
Continue up in the corner. The rappel anchor is marked with old ropes, near the top of Firmin’s Tower on the ridge. 20-25m. (III)
Pitch 12.
Continue up the crest of the ridge on the little broken rocky terrain. The ridge becomes steeper and you arrive at the Knife Edge. At the beginning of the edge, there’s a rappel anchor. 25-30 m. (II)
Pitch 13.
Continue the climbing on the Knife Edge ’till the steep yellow wall. Climb steeply up and R on blocks and cracks. THIS PITCH IS OFTEN ICY AND SNOWY. Pass the piton and belay the slings on the rappel horn. 45-50m, (V-V+).
Pitch 14.
From the belay, climb up and diagonally right on the cracks. THIS PART OF THE PITCH IS ALSO USUALLY ICY. 15-20. m later, you traverse to the right horizontally for 5 metres on a little bivy place. The belay is near the bivy. 25m. (V)
Pitch 15.
From the bivy place, you climb up on the ledges with loose rocks. 20–25 metres later, you turn left on the huge ledge below the West Ridge. You pass another good bivy place and go towards 55m. (II, Sc)
Pitch 16.
Climb 5 metres to the ledge, then follow the traverse on the ledge leftward. While you are at the beginning of Shipton’s Notch, you belay. There’s no fixed Belay. 55 m. (I-II)
Pitch 17.
A short 5-metre exposed traverse to the left leads into Shipton’s Notch. (V.)
From Shipton’s Notch, climb steeply up a crest for 15 metres to rappel webbing above. THIS PART IS OFTEN ICY. 30 m. (V)
Pitch 18.
Follow the ridge crest, weaving in and out of rock towers. There’s another exposed traverse on the left side of the ridge. Belay on the top of a huge tower. (40 m). (IV)
Pitch 19.
Continue climbing on the ridge crest, across to the funny horizontal corner. Then a ledges system you turn right. below the main summit block. Belay here below the steep blocks (there’s no fixed belay) 40 m. (II+)
Pitch 20.
When within about 40 metres of the summit, go a little to the left on the steep blocks and rocks, which are climbed up, back to the crest. Then another 15 metres of blocks to the right of the crest lead to easy ground. Belay here. There are ropes. (III). The summit is about 10 metres away on the right side.
On a good day, it takes 13 to 15 hours round trip from Austrian Hut Camp to accomplish Mt. Kenya Technical Climb: SE Normal Route.
What to bring:
Sleeping bag: one rated for four (4) seasons is fine. The bag should be a snug fit since if it is too large, there will be more cool air for the body to warm
- Rain Trouser
- Rain Jacket [Poncho]
- Balaclava [Hat Woollen]
- Warm Clothes down jacket
- Thermal underwear
- Fleece Jacket
- Hiking Boots
- Gloves
- Walking Sticks
- Head Torch
- Sunglasses
- First Aid box
- Ruck Suck 65L (duffel bags are unacceptable) to be carried by porters
- Day Pack 35 [For your personal effects]
- Optional comfort accessories;
Walking poles, hot water bottle, Bivy bag
Wet wipes; ideal for those who want to stay fresh but are unable to bear dips in the freezing mountain weather
4: Passport/Identification Card {ID}
5: Personal travel/ medical insurance
Notes
Climbing equipment: a rucksack (must be provided for the porters by the clients, duffel bags are unacceptable) mountain clothes/walking boots/tips/extras of a personal nature/drinks/sleeping bags (for hire)/medical and evacuation insurance.
For the climbing equipment, you have to bring your own harness, climbing boot, crampons, ice axe, warm sleeping bag, bivy bag, light tent, and rope.
The other climbing equipment, like friends, the figure of eight, and the stoppers, will be provided.
Layered clothing is strongly recommended.
*Clothing should be wool or silk, cotton fibre absorbs moisture, which can cause chills.
*Upper body layers – sweaters, wool jackets, rain parkas.
*Outer Layers: raincoat, wind shirt, rain pants, wind pants.
-
Other needs
*Mountain boots, 3 pairs of wool socks, gaiters, wool hats, woollen mittens, gloves, and sunglasses.
The above can be hired. Rates are on request.